Sri's Blog
Netflix Clone On AWS EC2
Build Docker image and added security checks(sonarqube,trivy) with Jenkins Pipeline

Day 89 - Project 10
Task-01 Create an IAM user and set policies for the project resources using this blog. Utilize and make the best use of aws-cli Mounting an AWS S3 bucket on an Amazon EC2 Linux instance using S3FS is a common task for storing and accessing data in an S3 bucket as if it were a local file system. S3FS is a FUSE-based file system that allows you to mount an S3 bucket to an EC2 instance. Here are the steps to accomplish this: 1. Set Up an Amazon EC2 Instance: If you don't already have an Amazon EC2 instance, you'll need to set one up. Ensure that the instance has the necessary permissions to access S3 by using an IAM role with S3 permissions. 2. Connect to the EC2 Instance: Use SSH or your preferred method to connect to your EC2 instance. 3. Install S3FS: You need to install S3FS on your EC2 instance. You can do this using package managers like yum or apt-get depending on your Linux distribution. Here are commands for common distributions: For Amazon Linux: sudo yum update -y sudo yum install s3fs-fuse -y For Ubuntu/Debian: sudo apt-get update sudo apt-get install s3fs 4. Configure S3FS: Once installed, you need to configure S3FS with your AWS credentials and the bucket you want to mount. You can do this by creating a credentials file and an S3FS configuration file. Create an AWS credentials file (e.g., ~/.aws/credentials) with your AWS access and secret keys: mkdir ~/.aws touch ~/.aws/credentials chmod 600 ~/.aws/credentials Edit the ~/.aws/credentials file and add your AWS access and secret keys: [default] aws_access_key_id = YOUR_ACCESS_KEY aws_secret_access_key = YOUR_SECRET_KEY Create an S3FS configuration file (e.g., ~/.s3fs_config) and set the IAM role or the credentials file path: touch ~/.s3fs_config chmod 600 ~/.s3fs_config Edit the ~/.s3fs_config file and add the configuration: # Use IAM role (if applicable) use_cache = false # Use credentials file (if not using IAM role) url = https://s3.amazonaws.com use_cache = false 5. Mount the S3 Bucket: Now, you can mount the S3 bucket to a directory on your EC2 instance using the s3fs command: mkdir /path/to/mount/point s3fs your-s3-bucket-name /path/to/mount/point -o passwd_file=~/.s3fs_config -o umask=022 Replace your-s3-bucket-name with the name of your S3 bucket and /path/to/mount/point with the directory where you want to mount the S3 bucket. 6. Access and Use the S3 Bucket: You can now access the S3 bucket as if it were a local directory on your EC2 instance. Any files you write to the mount point will be stored in the S3 bucket. Remember that S3FS has some limitations and may not be suitable for all use cases, especially high-performance scenarios. Make sure to review and test thoroughly for your specific requirements.
Day 88 - Project 9
Deploying a Django Todo app on AWS EC2 using the Kubeadm Kubernetes cluster involves several steps. Here's a high-level overview of the process: Prerequisites: You should have a Django Todo app Dockerized and pushed to a container registry (e.g., Docker Hub). You need an AWS EC2 instance for your Kubernetes cluster. Make sure you have SSH access to it. Step 1: Set Up Your AWS EC2 Instance Launch an AWS EC2 instance with an appropriate OS (typically, a Linux-based OS like Ubuntu). Note: minimum t3.micro and CPU 2 Make sure to configure security groups and firewall rules to allow traffic to your EC2 instance, especially for ports like 80 and 443 (if your Django app uses them). Install Docker on your EC2 instance as Kubernetes relies on it. Step 2: Install and Set Up Kubeadm and Kubernetes on EC2 SSH into your EC2 instance. Install Kubeadm, Kubelet, and Kubectl following the Kubernetes official documentation. To install Kubeadm, Kubelet, and Kubectl on an EC2 instance running a Linux-based operating system (e.g., Ubuntu), you can follow these general steps. Please note that specific installation commands may vary depending on your Linux distribution, so adjust the commands accordingly. Step 1: Update the Package Repository SSH into your EC2 instance and ensure your package repository is up to date by running: sudo apt update Step 2: Install Docker Kubernetes relies on Docker, so you need to install it first. You can use the following commands to install Docker: sudo apt install docker.io Start and enable Docker to run at boot: sudo systemctl start docker sudo systemctl enable docker Step 3: Install Kubeadm, Kubelet, and Kubectl Next, you'll install Kubeadm, Kubelet, and Kubectl. You can use a specific Kubernetes version or the latest available version: sudo apt update && sudo apt install -y apt-transport-https curl curl -s https://packages.cloud.google.com/apt/doc/apt-key.gpg | sudo apt-key add - echo "deb https://apt.kubernetes.io/ kubernetes-xenial main" | sudo tee /etc/apt/sources.list.d/kubernetes.list # Install the Kubernetes components sudo apt update sudo apt install -y kubelet kubeadm kubectl Step 4: Enable and Start Kubelet After installing Kubelet, enable and start it: sudo systemctl enable kubelet sudo systemctl start kubelet Step 5: Initialize Kubeadm (Master Node Only) If this EC2 instance is going to be your Kubernetes master node, you'll need to initialize Kubeadm. Run the following command to initialize it: sudo kubeadm init Follow the on-screen instructions to complete the initialization process. Make sure to note down the kubeadm join command provided; you'll need it later to join worker nodes to the cluster. Step 6: Configure Kubectl To configure Kubectl to work with your Kubernetes cluster, run the following command: mkdir -p $HOME/.kube sudo cp -i /etc/kubernetes/admin.conf $HOME/.kube/config sudo chown $(id -u):$(id -g) $HOME/.kube/config Step 7: Join Worker Nodes (Worker Nodes Only) If you have additional EC2 instances that you want to join as worker nodes to the Kubernetes cluster, SSH into each worker node and run the kubeadm join command provided during the master node initialization. It will look something like this: sudo kubeadm join <MASTER_IP>:<MASTER_PORT> --token <TOKEN> --discovery-token-ca-cert-hash <CA_CERT_HASH> Replace <MASTER_IP>, <MASTER_PORT>, <TOKEN>, and <CA_CERT_HASH> with the values specific to your cluster. After completing these steps, you should have Kubeadm, Kubelet, and Kubectl installed on your EC2 instance. The EC2 instance will either act as the master node or join the existing cluster as a worker node, depending on your needs. Step 3: Initialize Your Kubernetes Cluster On your EC2 instance, run the kubeadm init command to initialize the Kubernetes cluster. Step 4: Set Up a Pod Network Choose a Kubernetes networking solution like Calico, Weave, or Flannel and follow its installation instructions. This step is essential for your pods to communicate with each other. Step 5: Join Worker Nodes (if applicable) If you plan to use multiple EC2 instances as worker nodes in your cluster, you'll need to SSH into each of them and join them to the cluster using the command provided by kubeadm init on the master node. Step 6: Deploy Your Django Todo App Github link: https://github.com/sri766/django-todo-cicd Create Kubernetes deployment and service YAML files for your Django Todo app. Here's a basic example: apiVersion: apps/v1 kind: Deployment metadata: name: django-todo-deployment spec: replicas: 3 # Adjust as needed selector: matchLabels: app: django-todo template: metadata: labels: app: django-todo spec: containers: - name: django-todo image: your-django-todo-image:tag ports: - containerPort: 80 --- apiVersion: v1 kind: Service metadata: name: django-todo-service spec: selector: app: django-todo ports: - protocol: TCP port: 80 targetPort: 80 type: LoadBalancer # Use LoadBalancer if you want an external IP Apply the YAML files using kubectl apply -f your-deployment-service.yaml. Step 7: Expose Your Django App If you used a LoadBalancer service type, Kubernetes will automatically provision an external IP (AWS ELB) to access your app. If not, you may need to configure an Ingress controller and Ingress resource to expose your app. Step 8: Configure Your Domain If you have a custom domain, configure DNS to point to your app's IP address. Remember that this is a high-level overview, and each step may require more detailed configuration based on your specific needs. Additionally, you should consider using Helm for managing your Kubernetes deployments and creating Helm charts for your Django Todo app to simplify deployment and updates.

Day 87 - Project 8
Project Description The project involves deploying a react application on AWS Elastic BeanStalk using GitHub Actions. Git Hub actions allow you to perform CICD with GitHub Repository integrated. Task-01 Get source code from GitHub. Setup AWS Elastic BeanStalk Build the GitHub Actions Workflow Deploy to BeanStalk Steps Deploying a React application on AWS Elastic Beanstalk using GitHub Actions is a great way to automate your CI/CD pipeline. Below are the general steps you can follow to set up this workflow: Prerequisites: You should have a React application hosted on a GitHub repository. https://github.com/sri766/AWS_Elastic_BeanStalk_On_EC2 You need an AWS Elastic Beanstalk environment set up for your React application. Step 1: Configure AWS Credentials to Github Repo In your GitHub repository, go to Settings > Secrets. Add two secrets: AWS_ACCESS_KEY_ID and AWS_SECRET_ACCESS_KEY, which contains your AWS IAM user's credentials with permissions to deploy to Elastic Beanstalk. Step 2: Create a GitHub Actions Workflow In your GitHub repository, create a folder named .github/workflows. Inside the workflows folder, create a YAML file (e.g., deploy.yml) with the following content: Replace YOUR_AWS_REGION and YOUR_EB_ENV_NAME with your AWS region and Elastic Beanstalk environment name. Step 3: Push Changes Commit and push the .github/workflows/deploy.yml file to your GitHub repository. Step 4: GitHub Actions Workflow Go to the "Actions" tab in your GitHub repository to monitor the workflow's progress and check for any errors. GitHub Actions will automatically trigger the workflow when you push changes to the specified branch (in this example, the main branch). This workflow will check out your code, set up Node.js, install dependencies, build your React app, and finally, deploy it to your Elastic Beanstalk environment when changes are pushed to the main branch. Make sure to customize it to match your specific project's needs, such as configuring environment variables, running tests, or setting up other build steps. Remember to keep your AWS credentials secure as they are sensitive information. Using GitHub Secrets ensures they are securely stored and accessed during the workflow. Done!!🎉🎉
Day 86 - Project 7
Project Description The project involves deploying a Portfolio app on AWS S3 using GitHub Actions. Git Hub actions allow you to perform CICD with GitHub Repository integrated. Task-01 Get a Portfolio application from GitHub. Build the GitHub Actions Workflow Setup AWS CLI and AWS Login to sync the website to S3 (to be done as a part of YAML) prerequisite S3 bucket IAM access and secret access key Steps: Clone the GitHub Repo (https://github.com/LondheShubham153/tws-portfolio) Add workflow main.yml to your .github/workflow name: Portfolio Deployment on: push: branches: - main jobs: build-and-deploy: runs-on: ubuntu-latest steps: - name: Checkout uses: actions/checkout@v1 - name: Configure AWS Credentials uses: aws-actions/configure-aws-credentials@v1 with: aws-access-key-id: ${{ secrets.AWS_ACCESS_KEY_ID }} aws-secret-access-key: ${{ secrets.AWS_SECRET_ACCESS_KEY }} aws-region: us-east-2 - name: Deploy static site to S3 bucket run: aws s3 sync . s3://<your-s3-bucket-name> --delete Add Secrets and Variables Go to setting of the repo--->security and variable-->action-->new repo secrets and add access key and secret key Now, commit the changes to the GitHub repo files to active the workflow Check, that the s3 bucket files are uploaded. Now, on properties enable static file hosting. Now, copy the address paste it into the browser and see the magic.
Day 85 - Project 6
Project Description The project involves deploying a Node JS app on AWS ECS Fargate and AWS ECR Task-01 Get a NodeJs application from GitHub. Build the Dockerfile present in the repo Setup AWS CLI and AWS Login in order to tag and push to ECR Setup an ECS cluster Create a Task Definition for the node js project with an ECR image prerequisite: AWS CLI must be pre-installed on the local machine. Docker must be installed. Steps: Clone a node app from docker(https://github.com/LondheShubham153/node-todo-cicd) Create an ECR repository. View Push Commands and run locally on the directory where the git clone the node-app aws ecr get-login-password --region us-east-2 | docker login --username AWS --password-stdin 822255583253.dkr.ecr.us-east-2.amazonaws.com docker build -t node-app . docker tag node-app:latest 822255583253.dkr.ecr.us-east-2.amazonaws.com/node-app:latest docker push 822255583253.dkr.ecr.us-east-2.amazonaws.com/node-app:latest Now, Create a cluster on ECS(Elastic Container Service) Create a Task Definition Create a Service to connect to the node app Select the task family and add the Task service name select VPC and subnet Copy the public address IP and paste it on the Browser (Select service->Task->select the task->public IP) Done!!🚀💕
Day 84-Project 5
Project Description The project involves deploying a Netflix clone web application on a Kubernetes cluster, a popular container orchestration platform that simplifies the deployment and management of containerized applications. The project will require creating Docker images of the web application and its dependencies and deploying them onto the Kubernetes cluster using Kubernetes manifests. The Kubernetes cluster will provide benefits such as high availability, scalability, and automatic failover of the application. Additionally, the project will utilize Kubernetes tools such as Kubernetes Dashboard and Kubectl to monitor and manage the deployed application. Overall, the project aims to demonstrate the power and benefits of Kubernetes for deploying and managing containerized applications at scale. Steps Create a Netflix clone(in my case I created an HTML landing page which I have created) (GitHub link: https://github.com/sri766/netflix-clone-HTML.git) Build Dockerfile # Use a lightweight web server as a base image FROM nginx:alpine # Copy your HTML, CSS, and images folder to the web server's document root COPY index.html /usr/share/nginx/html COPY style.css /usr/share/nginx/html COPY images/ /usr/share/nginx/html/images/ # Expose port 80 (default for HTTP) for web traffic EXPOSE 80 # Start the web server when the container runs CMD ["nginx", "-g", "daemon off;"] Build Docker file docker build -t sri766/netflix-clone . docker run -d -p 8080:80 sri766/netflix-clone Minikube install- https://minikube.sigs.k8s.io/docs/start/ Push to Docker hub docker push sri766/netflix-clone Create Deployment.yml file apiVersion: apps/v1 kind: Deployment metadata: name: netflix-clone-deployment spec: replicas: 1 selector: matchLabels: app: netflix-clone template: metadata: labels: app: netflix-clone spec: containers: - name: netflix-clone-container image: sri766/netflix-clone ports: - containerPort: 80 Create Service.yml file apiVersion: v1 kind: Service metadata: name: netflix-clone-service spec: selector: app: netflix-clone ports: - protocol: TCP port: 80 targetPort: 80 type: NodePort apply deployment and service kubectl apply -f deployment.yml kubectl apply -f service.yml you can check services, run kubectl get services Access to http://<minikube-ip>:<nodeport> you can get ip-address by running Minikube ip ans Nodeport is the port after the ":" in the ports listing in services Done!!💕🚀
Day 83- Project 4(Docker Swarm)
Project Description The project aims to deploy a web application using Docker Swarm, a container orchestration tool that allows for easy management and scaling of containerized applications. The project will utilize Docker Swarm's production-ready features such as load balancing, rolling updates, and service discovery to ensure high availability and reliability of the web application. The project will involve creating a Dockerfile to package the application into a container and then deploying it onto a Swarm cluster. The Swarm cluster will be configured to provide automated failover, load balancing, and horizontal scaling to the application. The goal of the project is to demonstrate the benefits of Docker Swarm for deploying and managing containerized applications in production environments. prerequisite: EC2 instances(2 to 3 instances) - Swarm Manager and Swarm worker(we can increase no. of workers as much as we want) and allow port 8000 and 2377 Docker is installed in all the instances. Steps run sudo Docker swarm init in Swarm Server Paste the command in all worker server To check the node is connected run sudo docker node ls run the command to create a service sudo docker service create --name django-app-service --replicas 3 --publish 8001:8001 trainwithshubham/react-django-app:latest now run sudo docker service ls Now, just visit public_ip_addr of any node at port 8001 To detach any worker from the master just run sudo docker swarm leave on the worker server you can see it on the master server as a node is down Done!!💜
Day 82- Project 3
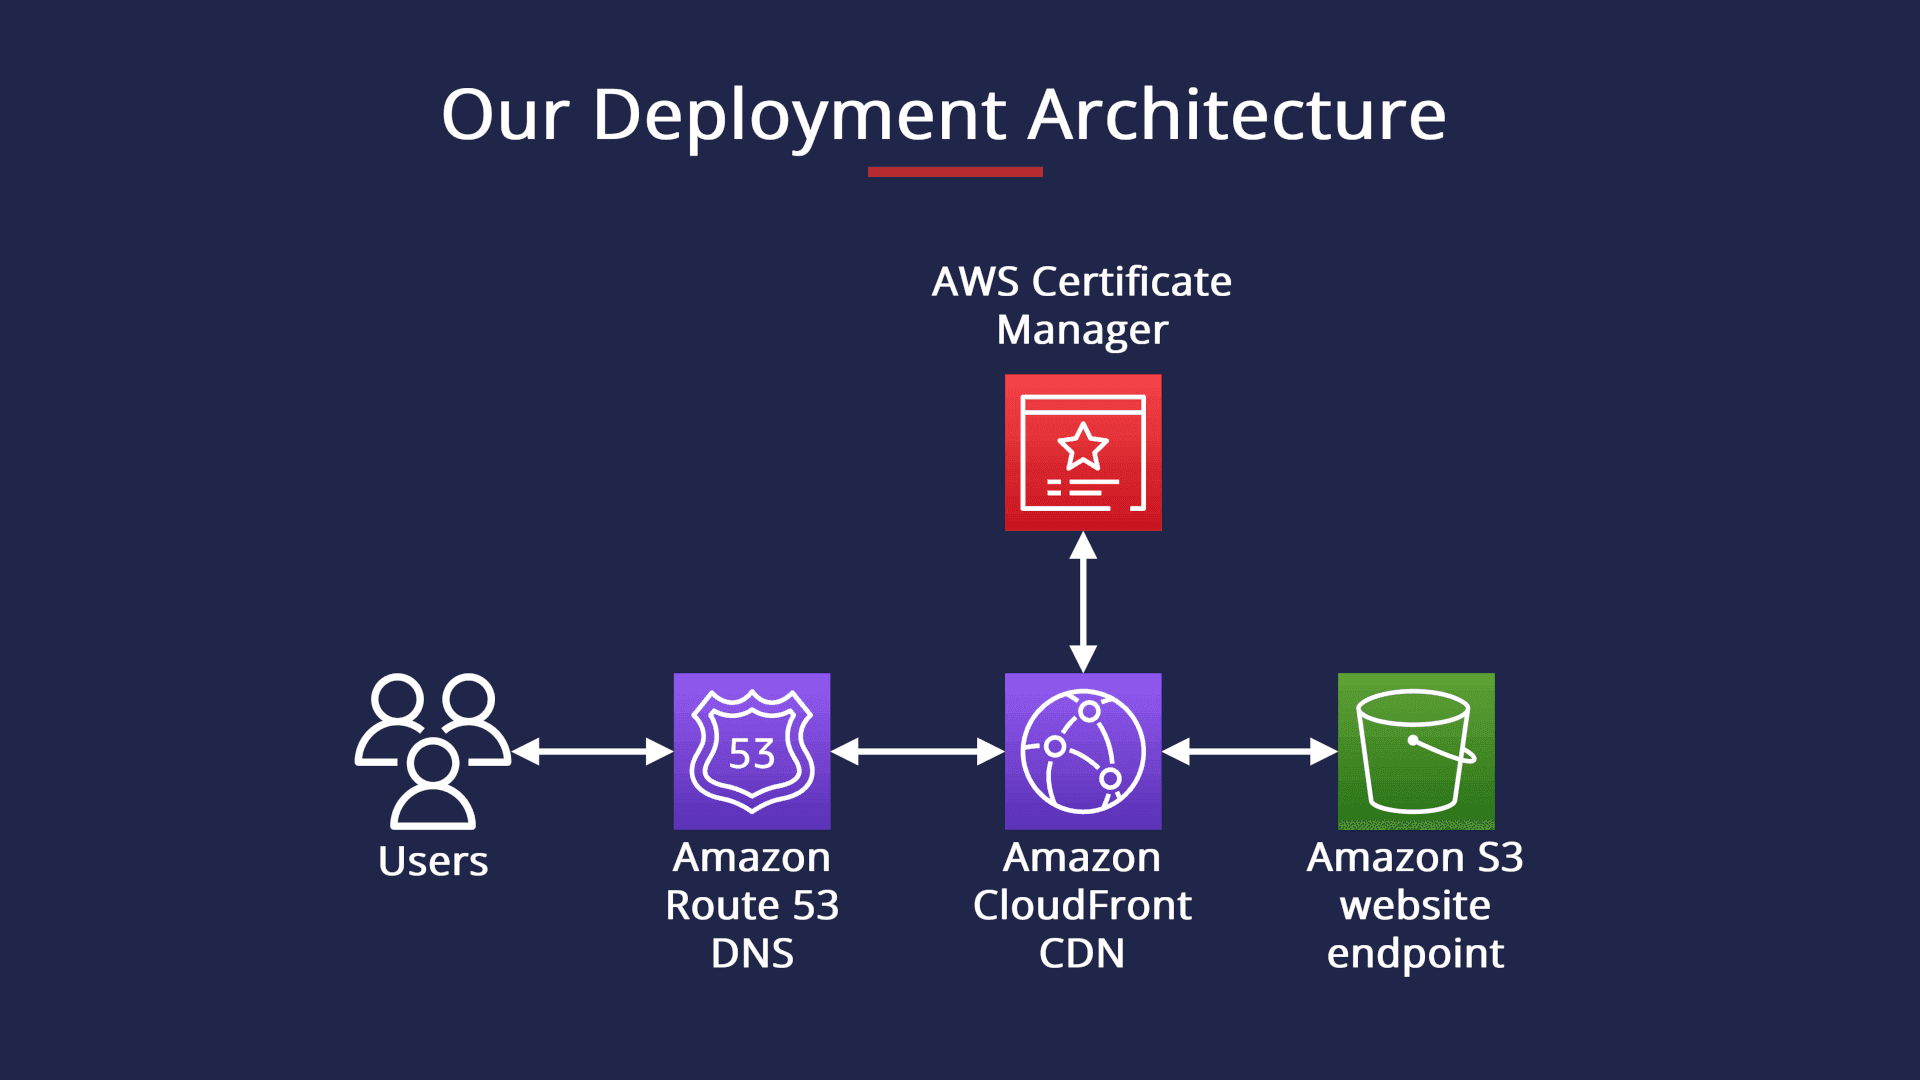
Hosting static website using AWS S3 bucket The project involves hosting a static website using an AWS S3 bucket. Amazon S3 is an object storage service that provides a simple web services interface to store and retrieve any amount of data. The website files will be uploaded to an S3 bucket and configured to function as a static website. The bucket will be configured with the appropriate permissions and a unique domain name, making the website publicly accessible. Overall, the project aims to leverage the benefits of AWS S3 to host and scale a static website in a cost-effective and scalable manner. Steps: Create a AWS S3 bucket static hosting policy must be enabled. goto properties->static hosting->enabled->add filename->save Add files to AWS bucket Click the HTML file and it provides you with a link, just click and congratulate you have hosting a site on AWS s3. website source link: https://www.free-css.com/free-css-templates/page295/applight Happy Learning!!